


Photo: Bric-a-brac
Have you heard of felting wool? It’s also known as wool for felting, wool felt, felted wool, or wool suitable for felting… In short, it’s a material made from carded or combed wool fibers that, through various techniques, we can interweave or mat to create all kinds of objects.
Brooches, pendants, cases, bags, dolls, little balls with different decorative uses… Depending on the technique you choose, felting wool opens up a whole new world of possibilities. Just a warning: they say it’s addictive.
TECHNIQUES FOR WORKING WITH FELTING WOOL.

Felted wool bunnies at Wayaiulandia
Felting wool is, in itself, a raw material that we have to shape or interweave to give it the form we want. It can be worked in two ways: dry, or with water and soap. Today we’re going to look at what dry felting involves and what kinds of projects you can make.
Dry felting.
For this, you need a special needle. A felting needle is very sharp, so it’s a good idea to protect the fingers you use to hold the wool fibers. It has notches that allow the filaments to tangle together until they form a firm fabric.

Felted wool fox at Fieltrunguis
It’s the easiest and fastest technique. It’s usually done on a piece of sponge or foam rubber, although some people do it on a brush. Working on a brush gives us a finer finish, with fewer little hairs sticking out of the felt; but foam rubber gives us better hold and therefore allows for more detail.
To show you how it’s done, we chose this video, which is only 5 minutes long and shows you how to make a flower with felting wool that you can then use as a brooch or decoration.
Isn’t it much easier than it seems?
We also saw another technique for achieving the shape we want, which involves using a mold (like the ones you use to cut dough into a star or heart shape). You simply place the mold on the foam-rubber surface, fill it with a layer of felting wool, and follow the same process of poking it with the needle until you get the desired effect.
Felting onto fabric.
When we work with felting wool, the reason for placing a piece of foam rubber underneath is that the wool fibers don’t get tangled with the foam fibers. And here’s the interesting part: if we place a suitable fabric between the wool and the base, we’ll fuse the felt fabric with the garment’s fabric, creating a kind of “embroidery.”
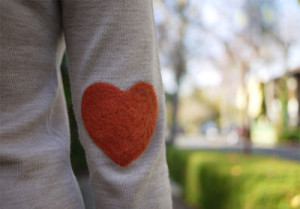 Take a look at this fantastic idea we found on Honestly WTF: adding heart-shaped felted wool elbow patches to a sweater. The tutorial is in English, but you really don’t need to read it because it’s wonderfully explained step by step and photo by photo.
The result is beautiful, and the idea lets us apply any kind of shape to any part of a sweater, jacket, or any lightweight wool garment. For example, you can put the heart on the chest instead of the elbow. You need to choose a fabric that isn’t too tightly woven, like the one you saw in the tutorial.
What do you think? Quite a discovery, right? Would you like us to carry it in the shop?
Stay tuned because in the next post we’ll continue with felting wool: we’ll show you the technique for working with it using water. This other technique will let us make different kinds of projects, such as decorative balls, earrings, necklaces…
Don’t miss it!